My wife and I have about a month between finishing up our fellowship work and the big move to Indy. She has spent the past two weeks on a road trip with her best friend, which has been wonderful – but, to all four readers of this blog – I miss her so much. I did take the first week off to spend some much needed time with my family. It was no break, though, as they are very involved with their local animal shelter. They currently have 12 foster kittens that they’re caring for – 6 bottle babies, 4 who are 6 weeks, and 2 who are 12 weeks – and they go to the shelter to help out with the dogs on the side. So I’ll let this blog post also serve as a friendly reminder to please spay and neuter your pets – and, if you’re thinking of breeding them, don’t.

Anyways, while she’s been road trippin’, among my efforts to finish packing, I’ve been working on this recipe for a tiramisu for her birthday to celebrate when she returns home. Kari doesn’t have much of a sweet tooth, but there is one thing that she will always order: the tiramisu at Grano Pasta Bar. This is nothing even close to that, but i’m giving myself an A for effort and thoughtfulness.

This entire endeavor begs the question: are lady fingers the world’s most boring dessert?
I was planning to just grab a package of them, make the fillings and call it a delicious day. But, alas, I could not find lady fingers anywhere. I even trekked to Trader Joe’s on a Sunday, which is a special kind of hell.
Henceforth, this recipe is now also DIY fingers. However, if you can find them, I probably wouldn’t expend the extra effort to make them at home. I made my fingers one day before I assembled the rest of the dessert, which then got to sit overnight in the fridge before eating it. You could definitely make them the same day, but you at least want to give your tiramisu some time to soak up all of the flavors, you know?
Lady Fingers
Ingredients
- 3 eggs
- 1/2 cup sugar
- 1 teaspoon vanilla
- 1 teaspoon salt
- 2/3 cup flour
Directions
-
- Pre-heat oven to 350ºF
- Separate the eggs – whites into one bowl, yolks into another
- Beat yolks on high speed with 1/4 cup of sugar, the vanilla, and salt. Once mixed, return the yolky mix to it’s original bowl that you separated the yolks out in
- Beat the egg whites on a high speed, slowly adding the remaining 1/4 cup of sugar until peaks form

- Add the yolky mix into the peaks and mix on a very low speed
- Slowly add the flour and continue to mix on a low speed until your batter is fully mixed
- Place batter in an icing piping bag or ziploc bag and pipe about 3″ long finger-strips. You want to be sure that the cookies are about the same size so they all cook evenly

Mary Berry would not approve - Bake for 12-13 minutes
Allow fingers to cool and either immediately use for tiramisu or store up to one week in an air-tight container


Here’s the thing: Yes, they’re bland. But! We are about to do some layering magic that is going to make them taste amazing. Plus, all of that egg whipping made these little ladies extra porous to soak up so much coffee and rum – yes, I said rum. I know this is supposed to be made with wine. I don’t think I can stand a trip to the liquor store after Trader Joe’s, though. That reminds me – soon we will be able to buy beer (and wine!) in grocery stores! It’s the little things.
Tiramisu
Ingredients
- 5 egg yolks
- 1 1/4 cup sugar
- 8 oz mascarpone cheese
- 16 oz heavy whipping cream
- 2 tablespoons vanilla
- 4 tablespoons powdered sugar
- 3/4 cup + 1 tablespoon Kahlua
- 3/4 cup espresso
- Cocoa powder for dusting
- the fingers
Directions
- I started by brewing some espresso. Set aside 3/4 cup in a bowl, place in the fridge for later, and treat yourself to the rest. While you’re in the fridge, go ahead and place an empty mixing bowl in there for your whipped cream later

- While espresso is brewing, separate 5 eggs. We aren’t going to use the whites, so save them for whatever you feel is up next – super healthy omelette later? That’s between you and your leftovers. We are then going to get a double boil situation set up and gently cook the 5 egg yolks with the sugar. I say situation, because anything that I own that would have been moderately helpful in making this dessert has already been packed away. I can’t understate how genius I think that I am for using pyrex bowls as measuring cups. Cook until slightly frothy and then transfer the mix to a mixing bowl. Place mix in the freezer for 15 minutes for a cool down break

- Adapt, overcome
- While yolky mix is cooling, grab the empty bowl from the fridge and it’s time for whipped cream! Add the cream, powdered sugar, and vanilla and mix on a high speed until peaks form. This dessert is all about the peaks
- Now get the yolky mix back out of the freezer and we are going to mix it with the mascarpone cheese, 1 tablespoon of Kahlua, and half of the whipped cream in that order, adding ingredients slowly

- I want to make crepes filled with this?
- Time to start assembling into an 8×8 inch pan! First add 3/4 cup Kahlua to the espresso. Dunk the lady fingers and assemble half of them on the bottom of the pan. When I was dunking it wasn’t a quick dunk – these ladies were going for a leisurely, drunken swim

- Once they’re covered in that magnificent filling, nobody will remember this monstrosity
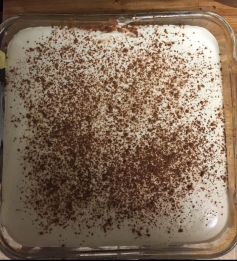
- Once you have this layer down, cover with half of your yolky-whip mix. Repeat fingers, yolky-whip mix, and then finish off with a generous layer of remaining whip and top with a dusting of cocoa powder. Allow to set in the fridge for at least 6 hours before serving